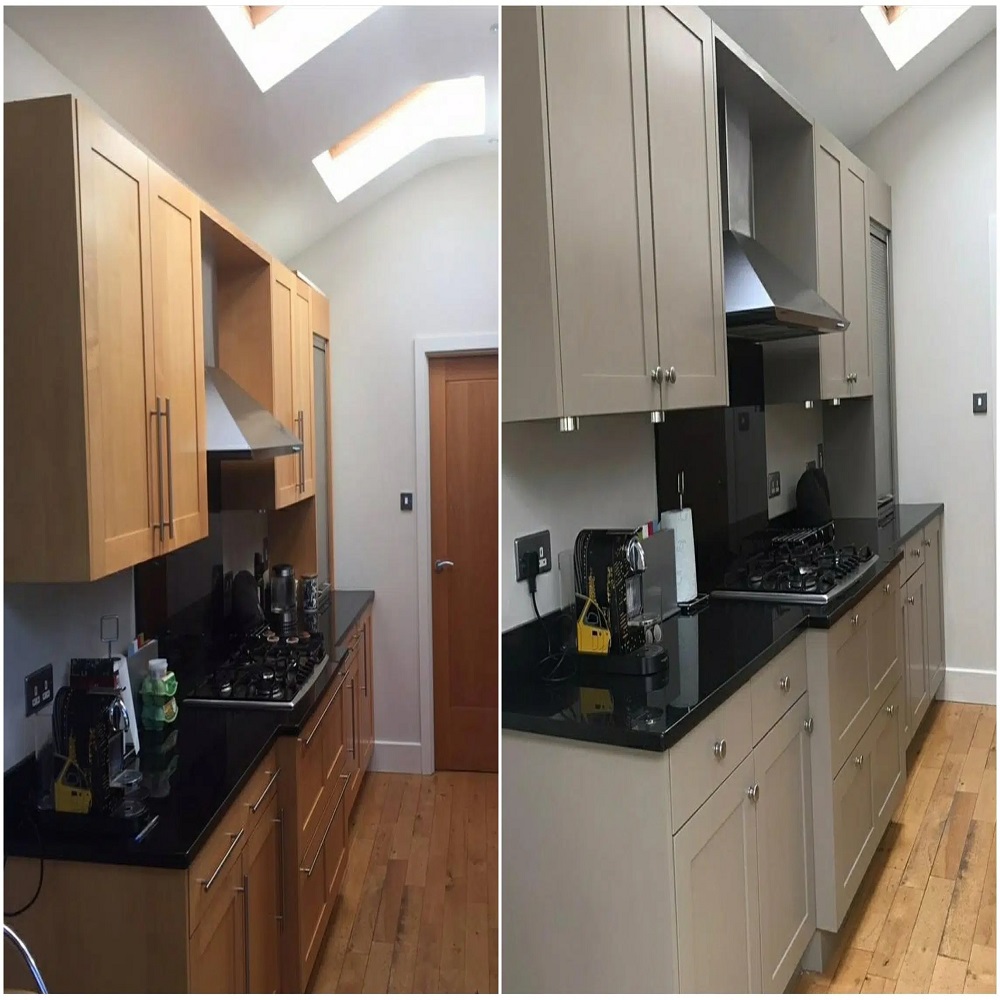
Introduction to Painting Laminate Cabinets
Painting laminate cabinets offers a budget-friendly makeover for your kitchen or bathroom. Unlike wood, laminate is a non-porous surface that requires special attention prior to painting. To achieve a lasting, professional-quality finish, selecting the right materials is crucial.
Begin by choosing a specific paint designed for laminate cabinets to ensure the best adhesion and durability. The overall success of the project hinges on using a high-quality primer suitable for laminate surfaces.
To get started, you’ll need to thoroughly clean the cabinets and sand them to create a surface that the primer can bond to. Sands lightly to avoid damaging the laminate. Remember, the best primer for laminate cabinets is one that is formulated to create a strong bond with the challenging surface of laminate.
Throughout the painting process, be careful to avoid common mistakes such as skipping the cleaning or sanding steps, or picking the wrong primer and paint. These errors can lead to peeling and chipping, undoing all your hard work.
With the right tools and technique, painting your laminate cabinets can transform your space without the hefty cost of a full remodel. Plus, with proper maintenance, your newly painted cabinets will look great for years to come.
In the upcoming sections, we’ll dive into each step of the process—preparation, primer selection, painting, and maintenance—giving you the confidence to take on this DIY task. By the end, you’ll see how painting laminate cabinets can be an effective way to revitalize your space.
Preparing Laminate Cabinets for Painting
Painting laminate cabinets starts with good preparation. Taking the right steps before you paint ensures a finish that lasts. Here’s how to prepare your cabinets the right way.
Choosing the Right Materials
Before you start, gather all the necessary supplies. You’ll need a specific kind of paint designed for laminate. Also, high-quality primer is crucial for adhesion. Ensure you have a sanding block, drop cloths, screwdriver, brushes, and a roller brush for application.
Cleaning and Sanding
Clean the cabinets to remove any grime or grease. Use a mild detergent and warm water, then let them dry fully. Once clean, sand lightly with 120-grit sandpaper. Do not over-sand, as this could harm the laminate. Dust off any residue after sanding. It’s all about creating a texture that the primer and paint can stick to.
When you choose materials and clean and sand your cabinets carefully, you’re setting up for success. It’s the foundation for your entire painting project. With this preparation, you get a smoother finish and better paint durability.
Selecting the Best Primer for Laminate Cabinets
Choosing the best primer for laminate cabinets is key to a flawless paint job. The primer acts as a strong adhesive layer between the laminate and the paint. It must bond well to prevent chipping and peeling. Here are steps to select the right primer for your cabinets.
Understanding Primer Types
There are various types of primers, but not all work with laminate. The best primer for laminate cabinets will be a ‘bonding primer’. This type is specially made to stick to glossy surfaces like laminate. It creates a surface that paint can easily adhere to.
Bonding primers usually come in oil-based or latex-based options. Oil-based primers offer great adhesion and stain blocking. Yet, they can be harsh and have strong fumes. Latex-based bonding primers are easier to work with and have less odor. They also clean up with soap and water.
Recommended Primer Products
For painting laminate cabinets, experts often recommend certain products. Popular choices are Zinsser B-I-N and Kilz Adhesion. These products are known for their strong bonding qualities. They work well on tough-to-paint laminate surfaces.
When applying primer, follow the manufacturer’s instructions. Use a high-quality brush or roller for an even coverage. Allow it to dry thoroughly before applying paint. This step helps achieve a long-lasting finish on your cabinets.
Selecting the best primer is crucial for painting laminate cabinets. It ensures a smooth and durable finish. Always check the primer is suitable for laminate and follow proper application methods.
Step-by-Step Painting Procedure
Applying Primer Effectively
Once your cabinets are clean and sanded, it’s time to apply primer. Use a high-quality brush or roller to apply a thin, even layer of bonding primer. Make sure you cover all surfaces. Let the primer dry completely before moving to the next step.
Sanding Between Coats
After the primer dries, lightly sand the surface with fine-grit sandpaper. This creates a smoother base for the paint. Remove all dust with a tack cloth or vacuum before you start painting.
Final Paint Application
Stir your paint well before using. Apply with a good quality brush or roller suitable for the type of paint you’re using. Aim for long, even strokes to avoid marks. Wait for the first coat to dry. Sand it lightly, then apply a second coat. Your cabinets will need this to have the best finish and durability. Allow the paint to cure for a complete week before reattaching hardware or using the cabinets.
Common Mistakes and How to Avoid Them
Painting laminate cabinets can be tricky. Some common errors can lead to a less-than-ideal finish. Knowing what these are can help avoid them.
Importance of Surface Preparation
One big mistake is not preparing the surface well. Always clean and sand your cabinets before priming. This step is key to making sure the primer and paint stick. Do not skip this, or you may face paint peeling off later.
Selecting the Wrong Paints and Tools
Another issue is using the wrong paints or tools. Remember, laminate cabinets need specific paints and primers. Pick a primer that’s made for glossy surfaces. For paints, use ones specially formulated for laminate. Also, use quality brushes and rollers for a smooth finish. Avoid common paint and roller types that are not meant for laminate.
By avoiding these mistakes, your painted cabinets will look great and last longer. Pay attention to these tips, and you’ll end up with a professional-looking result.
Maintenance Tips for Painted Laminate Cabinets
After painting your laminate cabinets, proper care will keep them looking their best. Follow these maintenance tips to protect your hard work.
Proper Cleaning Techniques
To clean painted laminate cabinets, use a soft cloth and mild detergent. Avoid abrasive cleaners that can scratch the surface. Wipe spills quickly to prevent stains. Rinse with water and dry with a clean towel. Be gentle to avoid wearing the paint.
Protecting the New Finish
Use felt pads on cabinet doors to prevent chipping. Don’t use harsh chemicals for cleaning. Instead, choose pH-neutral cleaners. Touch up chips immediately to prevent further damage. Place mats or trivets under hot items to save the surface. Keep cabinets dry to avoid paint lifting from moisture.
By using the right cleaning methods and protecting the finish, your cabinets will stay looking new. Remember these tips to maintain the beauty of your laminate surfaces.
Cost Considerations and DIY vs Professional Painting
Embarking on a cabinet painting project requires a budget. Whether to tackle it yourself or hire a professional is a key decision that hinges on cost, time, and your comfort with DIY tasks. Here’s a look at some cost considerations and the decision between DIY or professional painting.
Estimating Your Painting Project Budget
Budgeting is the first step. Costs include primer, paint, tools, and materials. A thorough budget counts every screwdriver, paintbrush, and drop cloth. Expect to spend between $200 and $400 on a DIY project for average-sized kitchens.
Buying the best primer for laminate cabinets is a must, and it can be pricey. High-quality paints follow, but they ensure a durable finish. Don’t forget to factor in potential mishaps that might require additional purchases or professional help.
Deciding Whether to DIY or Hire a Professional
DIY appeals to those who enjoy hands-on work and have the time. It allows for direct control over materials and results. If you have a clear vision and proper skills, DIY could save you money.
However, professionals offer expertise and efficiency. They have the right tools and experience to avoid common mistakes. Hiring a pro can be costlier, ranging from $400 to $1,300. But it could mean a worry-free process with guaranteed results.
Consider your skill level, the project’s scale, and your willingness to commit time. Assess if learning the process is part of your goal. Sometimes, the satisfaction of a DIY job well done is priceless.
In summary, weigh the costs and benefits of DIY versus professional painting carefully. A budget-minded approach balanced with quality considerations will guide your choice for this important home improvement project.
Finalization and Reassembly
After painting your laminate cabinets and following the given steps for a perfect finish, it’s time to finalize and reassemble the pieces. Patience here is key, as rushing could ruin the paint job. Here’s how to wrap up your cabinet makeover project successfully.
Curing Time Before Use
Allow ample curing time for the paint before using the cabinets. This time varies based on paint type but typically takes about a week. The right curing time ensures the paint adheres properly and withstands daily usage. Don’t put anything on or in the cabinets during this period.
Reinstalling Hardware and Fixtures
Once the paint is fully cured, you can start putting the hardware and fixtures back. Reinstall knobs, handles, and hinges with care. Use a screwdriver, not a power drill, to avoid damaging the new paint. If you’ve bought new hardware, it may give your cabinets a fresh, updated look.
By taking your time in the finalization and reassembly stage, you maintain the professional quality of your work. Your revitalized laminate cabinets are now ready to be enjoyed, with a fresh look that can last for years.