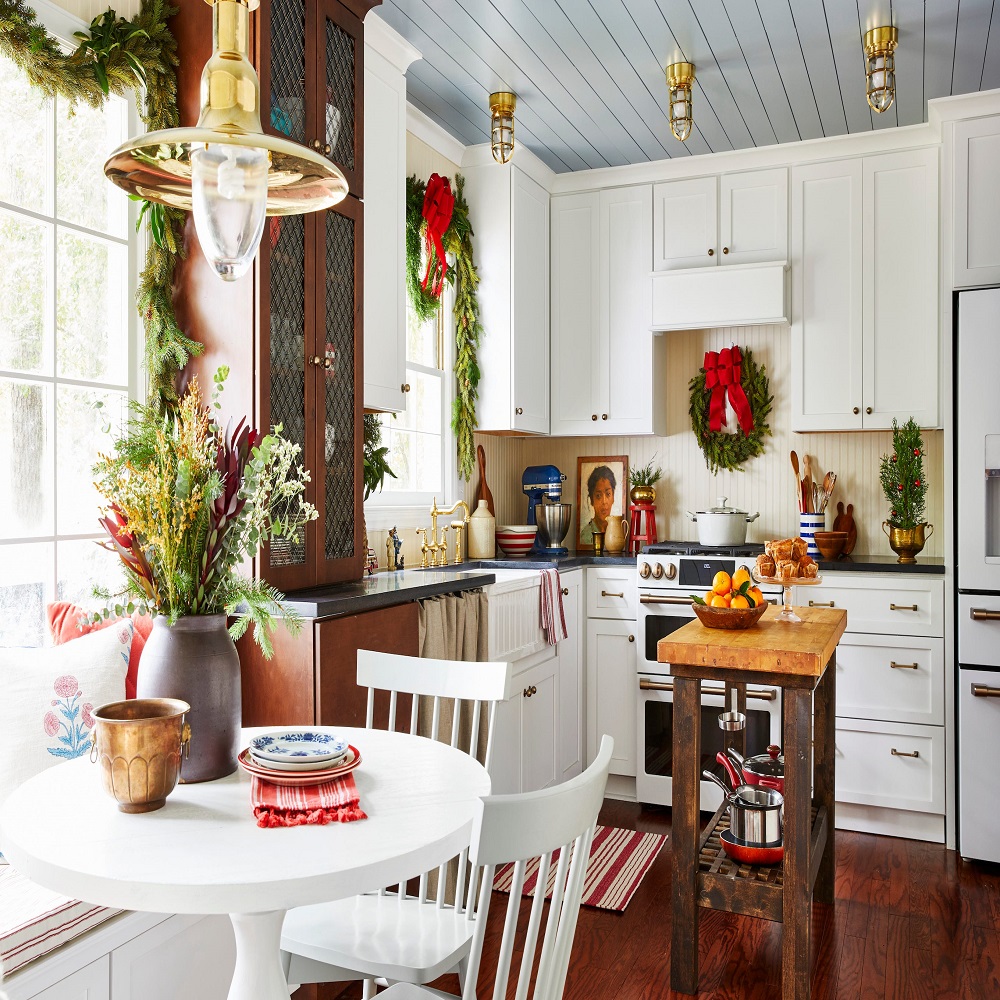
Inspiration for Renovating a 1970s Kitchen
Transforming a kitchen from a bygone era can be an exciting challenge. Drawing on the rich history of the 1970s design, a kitchen remodel can pay homage to the past while infusing it with modern sensibility. Before embarking on this journey, it is crucial to gather some creative inspiration.
One idea is to embrace the distinct aesthetics of the 1970s kitchen cabinets, often characterized by their unique color palette and patterns. These elements evoke a sense of nostalgia and can be cleverly updated to fit today’s style preferences. Consider retaining some original features—like the iconic cabinetry—while adding contemporary twists, such as fresh, bright paint or updated hardware. Integrating modern appliances into the classic framework highlights a balance between old and new.
The goal is not just to renovate but to transform the kitchen into a space that reflects the homeowners’ personalities and meets their current needs. By looking at before and after photos of 1970s kitchen remodels, one can gain insight into how to maintain the essence of the era whilst making the necessary updates for a functional and stylish kitchen. Whether the aspiration is to create a bold statement or a seamless blend of past and present, inspiration can strike from a variety of sources—think vintage home decor magazines, visits to period homes, or even family heirlooms.
When rejuvenating a 1970s kitchen, it’s essential to weigh function against form; practical considerations should guide the design. The harmony between aesthetics and utility will ensure a transformation that is not only pleasing to the eye but also serves the evolving lifestyle of the household. As the starting point of any remodel, let inspiration guide you through the journey of creating a kitchen that resonates with the charm of the 70s while embracing the advancements of the modern day.
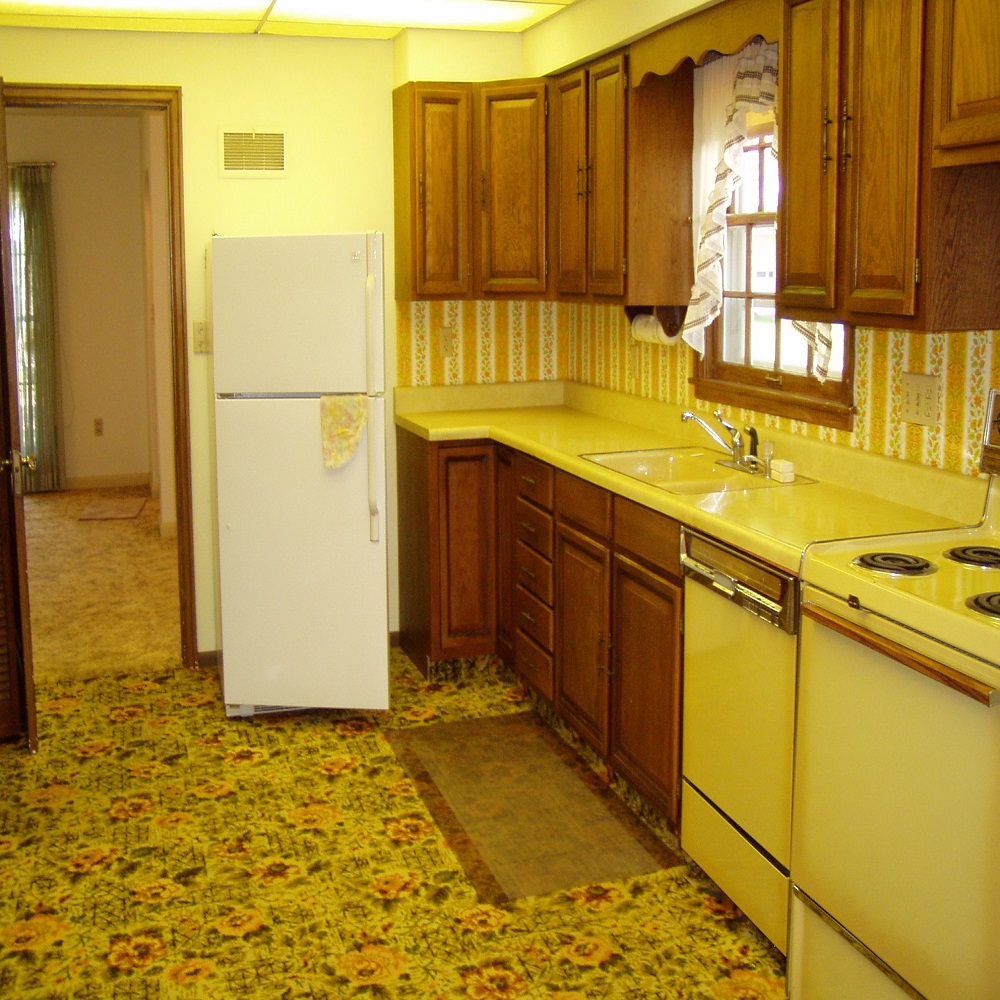
The Original 1970s Kitchen: Before the Makeover
Stepping back in time, the original 1970s kitchen of my brother and sister-in-law, Nathan and Ashley, spoke volumes of the era’s charm. Picture dated cabinetry, retro flooring, and a distinct passthrough between the dining room and kitchen. It was all there, untouched and oozing with potential. Yet, the kitchen’s layout and design were outdated, with large bulkheads that made the space feel cramped and closed off.
The couple had been living with these time-worn features, which included the kitchen’s original cabinets and flooring. While the design was authentic to the period, it lacked the functionality and style desired in a modern-day kitchen. The aim was clear: revamp the dated space into a vibrant area that melded the past with the present. To make this happen, a plan was put in place to increase storage capacity with updated cabinetry and create a brighter ambiance.
A significant structural change that Ashley and Nathan wished for was the removal of the wall separating the kitchen from the dining area. Doing so would not only open up the space but also bring a sense of modernity to the home. The vision for the kitchen was gradually taking shape, and soon the awaited transformation would begin. The goal was to breathe new life into this relic from the ’70s with a thoughtful redesign that would cater to their storage needs and aesthetic preferences. The journey from the original outdated look to a refreshed and functional kitchen was about to start.
Planning the Transformation: Design and Layout
When Nathan and Ashley contemplated their kitchen’s rejuvenation, careful design and layout planning was vital. They yearned for a kitchen that didn’t just look refreshed but functioned better for their lifestyle. To achieve this, we considered every element that could impact the space’s aesthetics and utility.
Our starting point was to select cabinetry that offered ample storage without sacrificing style. Nathan and Ashley expressed a desire for deep wood-toned cabinets below and lighter hues above, balancing coziness with an airy feel. We decided on shaker-style cabinets for their timeless appeal and simplicity, which complements various decor themes. We complemented these with brushed gold lighting and hardware to add an understated luxury feel.
The layout presented its own set of challenges and opportunities. The original kitchen had an undesirable wall separating the dining room, which we agreed to demolish to create an open floor plan. This would foster a more sociable cooking and dining experience. In place of the wall, an island would stand, providing extra worktop space, storage, and a casual seating area. The fridge and stove would switch places for a more practical workflow, ensuring the stove was conveniently near the pantry.
Careful attention was also given to the flooring plan. New flooring needed to harmonize with the rest of the house while offering the durability needed for a high-traffic area. The final design was a culmination of modern practicalities and nods to the ’70s flair, anticipating the enhanced functionality and cultural charm that the makeover would bring.
In the end, the design and layout changes were more than an aesthetic update; they were a strategic reimagining of living space tailored to meet the homeowners’ needs. The vision was set, and with every decision, we moved closer to a kitchen that symbolized a perfect meld of two eras.
Demolition and Preparation: Removing Walls and Cabinets
The transformation of Nathan and Ashley’s 1970s kitchen began with a crucial phase: demolition and preparation. This step was essential for setting the stage for the new design elements that would soon define the space. Our focus was on eliminating the barriers that made the original kitchen feel cramped and isolated.
Firstly, we tackled the daunting task of removing the wall between the kitchen and the dining area. This critical action was not just about demolition but about reimagining the space’s potential to be more inclusive and open. The removal of this wall promised a seamless transition between the two areas, enhancing both functionality and social interaction within the home.
Following the wall demolition, we moved on to the original cabinetry. While these cabinets had served well for decades, they were not suited to the needs of a modern household. We carefully dismantled them, ensuring that we could recycle or repurpose materials where possible. This step was about respecting the home’s history while making way for updated features that would better serve the homeowners.
Preparation also involved making the necessary structural adjustments after the wall was removed. This included reinforcing the ceiling where the wall had been and ensuring that the space was structurally sound for the open-plan configuration. Every action in this phase was aligned with our vision of transforming the 1970s kitchen into a more accessible and inviting space.
By the end of the demolition and preparation phase, the kitchen was a blank canvas, ready for the new structures, cabinets, and design elements that would redefine its appearance and functionality. This stage, although challenging, was a pivotal step towards achieving the modern, open-floor kitchen Nathan and Ashley envisioned.
Building and Installation: Cabinetry, Island, and Counters
With the walls down, we embarked on the building and installation phase, focusing on the key elements of cabinetry, an island, and counters. Nathan and Ashley had chosen a two-tone cabinet design, opting for darker bases and lighter overhead cabinets. We selected pre-assembled units for a mix of cost-efficiency and ease of installation.
The installation of the island was a significant addition to the kitchen’s layout. To create a functional centerpiece, we combined several base cabinets and anchored them securely. The dark wood tone selected for the cabinetry added depth and contrast to the space, while also fulfilling the storage needs.
For the counters, we went with a durable and budget-friendly laminate for the perimeter. This light-colored countertop brought freshness to the kitchen, while a butcher block counter on the island introduced a rustic touch. The selection of materials proved to be a balance between aesthetics and practicality, echoing the homeowners’ desires for a stylish yet hard-wearing surfaces suited for everyday use.
This stage was not only about transformation but also precision, ensuring that each new addition blended seamlessly with the rest of the space. Our efforts were focused on creating a kitchen that Nathan and Ashley would love for its functionality and style—a true reflection of a successful 1970s kitchen remodel.
Finishing Touches: Backsplash, Crown Molding, and Trim
After the major installations, we turned our attention to the finishing details that would complete the kitchen’s transformation. For the backsplash, we chose classic white subway tiles. They add a timeless aesthetic while keeping the space bright. The warm grey grout contrasts subtly, elevating the overall design.
Installing crown molding was next. This detail adds a traditional touch and enhances the perceived height of the room, giving it a more elegant feel. We mounted the cabinets six inches from the ceiling and used painted MDF as a backer for the crown molding. This step ensured a cohesive look that matched the upper cabinets perfectly.
Trim work around the kitchen was also crucial. It helped frame the newly installed elements and polished the overall appearance. Each piece of trim was meticulously measured and cut to ensure it fit perfectly, reinforcing the craftsmanship of the entire remodel.
These finishing touches not only elevated the aesthetic appeal but also significantly increased the functionality and maintenance ease of the kitchen.
Upgrading the Hardware and Sink
After cabinets and counters were set in place, we focused on hardware and sink upgrades. The chosen handles, knobs, and pulls in champagne gold added warmth and a touch of luxury. The right hardware can transform the look of cabinetry, with an attention to detail that leaves a lasting impression.
The sink, an often-overlooked element, was up next. We installed a sizable stainless-steel sink to accommodate the family’s needs, paired with a modern faucet. The contrast of stainless steel against the rich cabinetry added to the kitchen’s updated feel.
These upgrades were not merely aesthetic; they were also about function. The sink’s size and quality ensures it stands up to daily use, while the hardware’s finish provides durability against the wear and tear of a family kitchen.
Selecting Appliances and Fixtures for Aesthetics and Savings
When upgrading a kitchen, selecting the right appliances and fixtures is crucial for melding form with function. A smart choice balances aesthetic appeal with cost savings, crucial for a 1970s kitchen remodel on a budget. Nathan and Ashley opted to keep their existing white appliances, a wise decision that provided savings and worked well with the new design. The classic white finish paired nicely with the new cabinetry, offering a clean, cohesive look without the expense of brand-new appliances.
We replaced the outdated lighting fixtures with modern, brushed gold ones that tied in with the new hardware and echoed the transitional theme. The lighting fixtures, in addition to being stylish, were selected for their energy efficiency, contributing to long-term savings. A perfect example is the pendant lighting over the island, which not only serves as a focal point but also offers task lighting where it’s most needed.
For the faucet, a sleek and contemporary design was chosen, which not only improved the kitchen’s functionality but also its visual appeal. It was important to find a balance between a high-quality look and practicality. A fixture that looks great and withstands the rigors of kitchen use guarantees the kitchen’s functionality and ensures cost-effectiveness over time.
Ultimately, the integration of appliances and fixtures was not only about beautifying the space but also about optimizing the kitchen’s overall efficiency and keeping to the project’s budget. Nathan and Ashley’s kitchen now boasts a mix of timeless design with modern efficiency, which is the essence of a successful 1970s kitchen transformation.
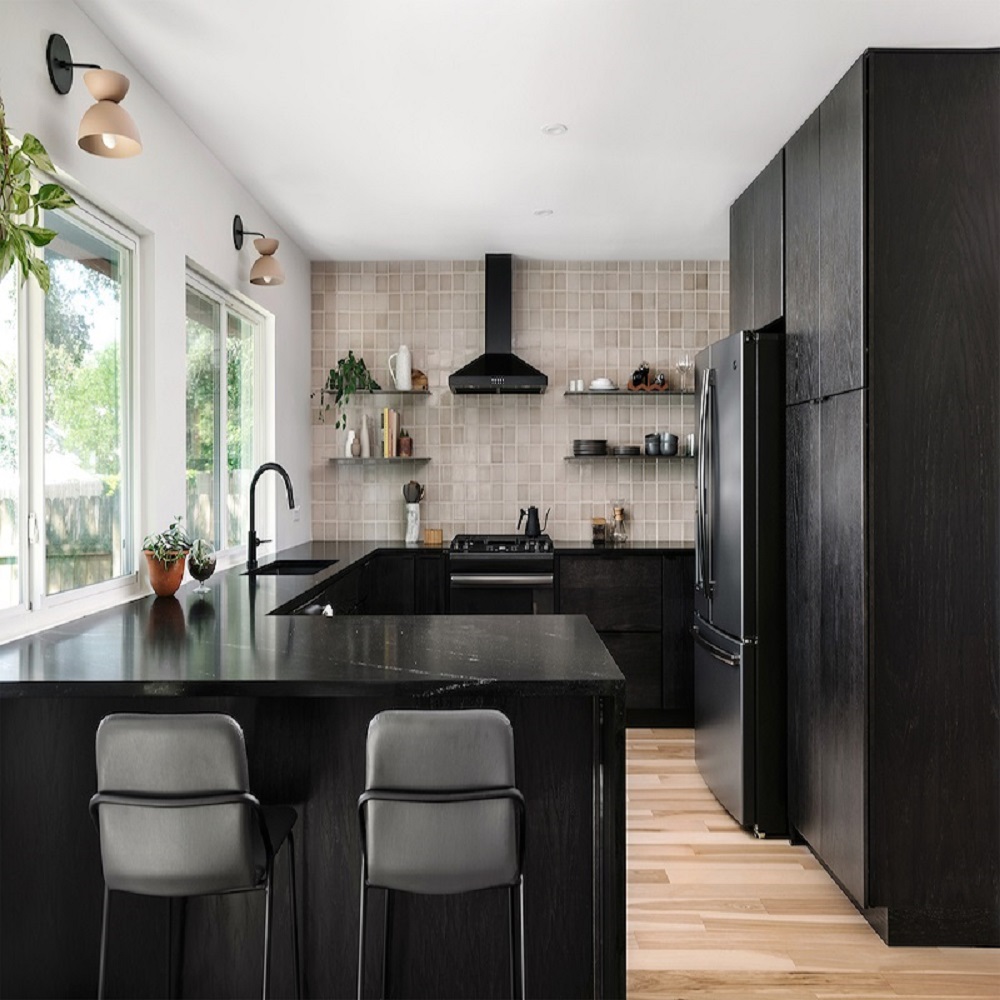
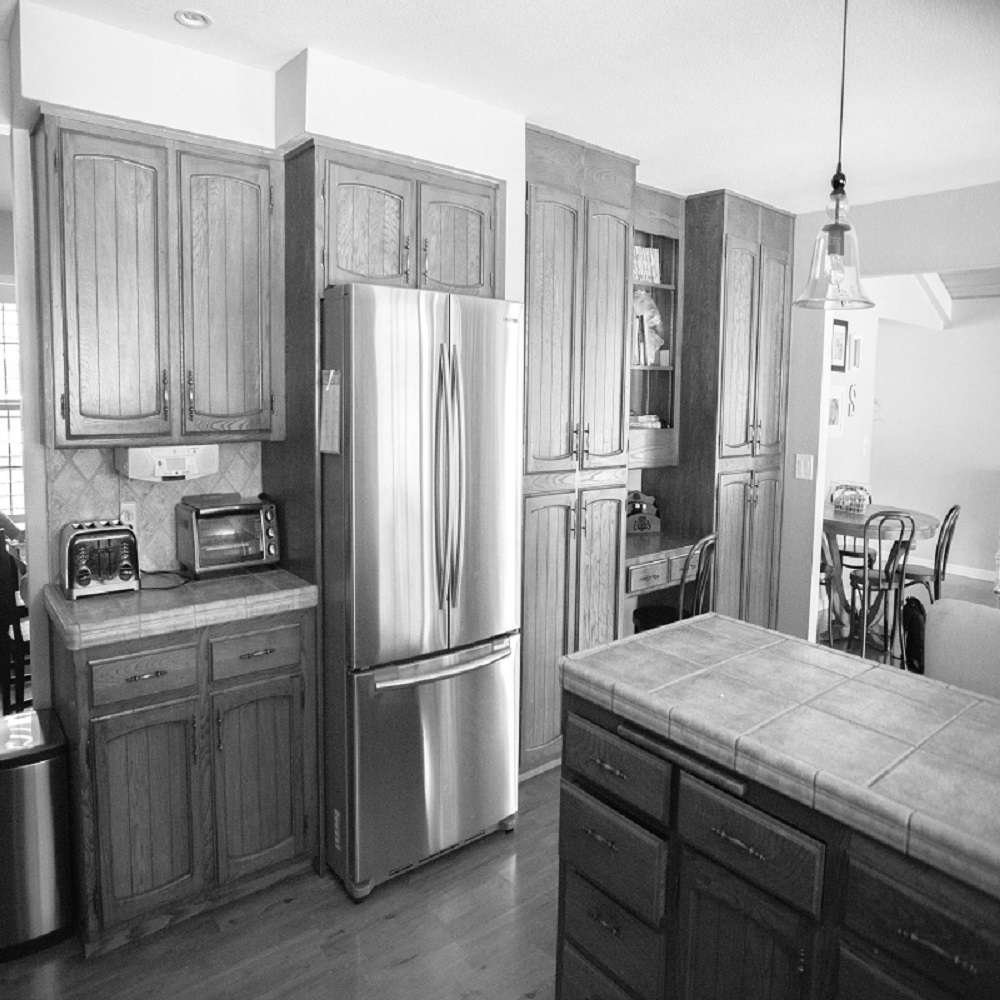
The Reveal: A Modern, Two-Toned Kitchen with a Transitional Twist
At last, Nathan and Ashley’s 1970s kitchen has undergone a full transformation. The reveal showcased a stunning modern kitchen with a two-toned color scheme. The darker lower cabinets and light upper cabinets blend the best of both eras. This design choice meets Ashley’s wish for easy-to-clean, yet stylish cabinetry. It also keeps the space feeling open and airy.
The newly added island, a showstopper, stands in the heart of the kitchen. It’s not just an aesthetic feature; it provides practical storage and a spot for casual meals. The butcher block countertop adds warmth and a rustic charm, perfect for this family’s daily use.
By removing the wall, we achieved a sweeping open-plan area that connects kitchen and dining room. This alteration has turned a once confined space into an inviting hub for family activities. The seamless flow between the two areas makes socializing and meal preparation a joyful experience.
All new touches, from the brushed gold hardware to the stainless-steel sink, complement the modernized space. Uniting these elements provides a cohesive look that feels both current and comforting. The white subway tile backsplash continues the classic yet modern theme.
For lighting, we installed brushed gold fixtures above the island and sink. These not only brighten the space but also add a touch of elegance. The careful selection of each piece has resulted in a balanced and harmonious kitchen.
Nathan and Ashley now enjoy a kitchen that honors the past while boldly stepping into the present. The final result of this 1970s kitchen renovation is a perfect fusion of traditional charm and modern practicality. It’s a space that prioritizes both style and function, offering inspiration for anyone looking to refresh their own kitchen space.